Wednesday, December 28, 2011

The Season of Giving - Giveaway Time!

This was my Christmas gift last year. Despite my love of decorating baked goods, I must have been living under a rock because I had never heard of cake pops or Bakerella (http://www.bakerella.com/). I paged through the book that night about 10 times over in complete wonder at the creativity within the pages.

"I expect you to make them," my cousin said. Outloud I said of course but inside, I was saying, "Me? Make these? Are you kidding me, I can't make these?! I'm not that talented!"

With Bakerella's easy to follow steps and my extreme patience and practice, I was able to teach myself how to make cake pops. Ever since I started making them, they are the number one baked item request I have from friends, family, and random people who want to order them for events or just because. Here are a few of my holiday ones from this Christmas.


Snowball, snowmen, and candy cane cake pops


You can see more of the cake pops I have made on my Facebook page. I'm no where close to being as talented and creative as Bakerella but one can aspire to do so, right? We'll I'm going to help you out. I know Christmas has come and gone but I'm going to continue the spirit of giving. I too want to give someone one of the coolest gifts I've ever received. I'm giving away all the things you will need to make one of my favorite basic cake pops, chocolate chocolate caramel crunch. I made these over and over again until I got better at rolling and dipping until I got confident enough to make more detailed designs. Here's what I'm giving away:

Bakerella's "Cake Pops" book
1-package of 60 sticks (sounds like a lot but you'll have quite a few rejects before you master the technique!)
1-package of Wilton chocolate candy melts
1-5 oz jar of turtle crunch sprinkles
1-spool of ribbon
1-package of wrappers (to make your cakepops look pretty!)
1-box of devils food cake mix
1-16 oz container of frosting

Your late Christmas gift. Unfortunately the book I'm giving away is not
 signed by Bakerella but it's still pretty awesome!

How to enter to win this kit

1) Leave a comment below letting me know what is the best Christmas gift you have ever received

Want more chances to win? Do one or all of the following and leave another comment for each in the comments section.

1) Like Lil Ms Sueshine on Facebook HERE

2) Follow @LilMsSueshine on Twitter HERE

3) Tweet this giveaway with a link like this: I heart #cakepops Enter to win cakepop supplies and Bakerella's book from @LilMsSueshine http://goo.gl/6F7VU

4) Go to BAKERELLA'S website and let me know which of her cakepops is your favorite!


The winner will be selected using random.org on Thursday, January 5th at 7:00PST. I will announce the winner on Friday, January 6th. Leave a way for me to contact you whether its your email, Twitter handle, or your Facebook name (sorry...I'll find a better comment widget for the next giveaway :( ). You have [3] three days to respond to me or I will pick a new winner. The giveaway is limited to residents of the United States (sorry to my international peeps!). Good luck everyone!


This giveaway is sponsored by Lil Ms Sueshine. All items in the giveaway have been paid out of my own pocket for the love of the products and my readers :)

Tuesday, December 20, 2011

Taste N' Tinis 2011 - Eat, Drink, & Shop!

I was long overdue for another food tour of my fine city. I was also long overdue to get some Christmas shopping done. When I heard about Taste N' Tini's, I was all for it. I mean, how could you really go wrong with food, martinis, and some shopping in Hillcrest? I messaged my friend Ashley (the creator of my lovely Lil Ms Sueshine logo!) and asked her if she wanted to join me. Very few people understand my obesession about breaking out my camera right in the middle of a meal. Ashley does because she's usually right there doing the same thing. I had a great time and I'm glad I was able to try out a few new places. I'll definitely be going back try more menus. My favorite of the night: Snooze, an AM Eatery. I LOVE breakfast and that's pretty much their whole menu. I'll take one of everything please! 

I highly encourage people to explore their cities and these tasting events are a great way to do it. Enjoy the little video I put together!


Tuesday, December 6, 2011

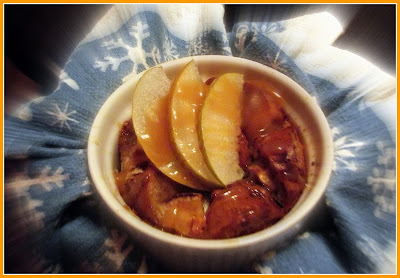
Caramel Asian Pear Bread Pudding

A lot of baked items that I write about and make on this blog have a memory attached to them. Unfortunately, I can't remember the first time or the first place that I had bread pudding. It couldn't have been that memorable then. I do know that I like bread pudding and I do know I've never made it before. So when I saw a recipe for it on Diabetic Living Online, I thought I'd try something new. But it felt weird to be making something that I had no real connection to. The recipe called for red pears and and I thought I'd change it up a little.

I do have memories attached to Asian pears. Usually fairly expensive (local grocery stores here in San Diego can charge up to $2.00 per pear), my mom, knowing they were one of my favorite fruits, would buy me one as a treat. I often remember carrying the round, slightly rough-skinned, yellow fruit in my hands in the special spongy wrap while my mom finished her grocery shopping, trying my best to resist biting into it. I was finally allowed to eat it when we got home because often times I would make a mess as I bit into it, getting the juice all over myself. That didn't stop me from munching happily away at the crunchy flesh. If you've never had an Asian pear, it's exactly what you would think a pear and apple would be like if they had kids.


Caramel Asian Pear Bread Pudding

  • 3 large day old or dried bagels of your choice
  • 3 tbsps margarine, melted
  • 2 Asian pear (peel, core, and cube 1 pear into small pieces)
  • 2 cups fat-free milk
  • 3 eggs, beaten
  • 2/3 cup sugar-free caramel ice cream topping
  • 1/2 teaspoon ground cinnamon


  • 1) Preheat oven to 300F. Cut bagels into cubes. If using fresh bagels, place on a baking sheet and toast in oven for 10 minutes or until slightly crispy.
    2) Turn oven up to 350F. Spray 5-6 large ramekins with cooking spray. Place bagel cubes into a bowl and pour melted margarine over cubes. Mix until completely coated. Mix in the cubed pears. Place bagel pieces into the ramekins.
    3) In a bowl, mix milk, eggs, caramel, and cinnamon together. Pour over the bagel mixture to slightly below the edge of the dish. Let the bagels soak in the liquid for approximately 5 minutes. Press down on the mixture gently with the back of a spoon.
    4) Bake for 50-60 minutes or until knife comes out clean. Cool on a wire rack for 30 minutes.
    5) Garnish with extra pear slices and caramel topping.

    Inspired by recipe on DiabeticLivingOnline.com

    Sueshine notes about this recipe
    Experiment with your bagels. Since it's fall, I used a seasonal bagel (cranberry walnut) from a local bagel shop. If a similar bagel is not available, you can always add dried cranberries or nuts into the bread/pear mixture for texture.
    If you do not have access to Asian pears, you can always use regular pears. The original recipe called for red pears but I would pick a pear variety that is firm and crunchy so it can stand up to the baking.
    Let the bagel soak in the liquid mixture. If you do not, you may end up with bread pudding with a side of scrambled eggs, especially if you are using a larger dish rather than ramekins.


    I wasn't too sure how my first attempt at bread pudding would turn out. I'm actually very picky about my bread pudding,. I am not a fan of super eggy (Is that a word? You know what I mean though) bread pudding or when it's nothing but a bowl of mush. The bagels added a softness on the inside but a slight chewiness outside. The nuts and pears add a little crunch. The caramel adds the right amount of sweetness to satisfy your sweet tooth and contrast to the tartness of the cranberries. Best part about it? It was a lot easier than I thought it would be to make. I'm very pleased with how it turned and I think I created another new baking memory.
    

    Sunday, November 20, 2011

    A Cooking Challenged Side Dish - Corn Casserole

    A few years ago my mom, being the matriarch of the family, decided it was time for me and my cousins to start contributing something to Thanksgiving dinner other than our mouths and bellies. Since cooking isn't my strong point, I'm always stuck making the green bean casserole because it's easy. Have I ever mentioned that I HATE green beans? As easy as the recipe is, since I don't eat it, I'm not sure how it is supposed to taste. Every year, I call my mom while I stand and stare at the frozen green beans in the freezer aisle, complaining about how I hate green beans and how I conveniently forgot how to make them. It never works by the way. This year, I made a preemptive strike and volunteered to make my PECAN PIE from last year. Luckily, my cousin also volunteered me to make corn dish before I got assigned green beans again.

    Corn dish (or casserole) was something I learned how to make from an old boyfriend's mom who knew I was cooking challenged. What is corn dish? It's baked macaroni and cheese with creamed style corn. Okay, I know what you're thinking and I thought the same thing too when I first tried it. I am a mac and cheese purist...just give me a bowl of plain, creamy mac & cheese and a spoon and I'll call it good. Trust me on this one. It couldn't get any simpler to make either.

    Corn Dish (or Corn Casserole)


  • 1 (15.25 ounce) can whole kernel corn, with liquid
  • 1 (14.75 ounce) can cream style corn
  • 1 cup small uncooked elbow macaroni or seashell pasta
  • 1/2 cup butter, cut into pieces
  • 1 cup cubed processed cheese '
  • 1/2 cup chopped onion (optional)


  • Preheat oven to 350 degrees F.
    In a medium baking dish, mix the whole kernel corn, cream style corn, uncooked pasta, butter, and processed cheese.
    Bake, covered, for 30 minutes. Remove cover, stir, and continue baking uncovered for 30 minutes.


    Sueshine Notes about this recipe:
    -This fits perfectly into a 9 inch deep, dish Pyrex pie dish. You can double the recipe and cook it into a 9x13 dish if you need to bring it to a larger gathering.
    -I tried making this recipe with shredded cheddar cheese and because of the all the butter and the oils from the cheese, it became pretty greasy. Oddly, I've never experienced that with Velveeta. Velveeta comes in a crumble form now in the shredded cheese aisle, making it easier to melt evenly.
    -When you stir it after 30 minutes, be sure to cover all the pasta with the sauce. Any uncovered pasta will not cook and you don't want any crunchy bits.

    There is something very comforting about corn dish. I love the sweet taste of corn (reminds me of summer) cut by the saltiness of slightly burnt cheese. I haven't made this in about 4-5 years but I still remember exactly how it tastes. It took a lot for me not to dig into the bubbling hot serving dish when I took off the cover.

    Happy Thanksgiving to you and yours! Gobble Gobble!


    Sunday, November 13, 2011

    Prescription for Pie & Mama's Pie in the Sky 2011


    "With Thanksgiving coming up, don't deny yourself a piece of pie. Just don't keep going back for more and you'll be fine." -Dr. K
    Me to my husband: "My doctor prescribe that I can have pie!

    ~~~
    Okay, well not exactly. Of course, the husband didn't buy it so just like so many things that I REALLY want, I had to make it. I scoured the Internet for an easy pie recipe because this was going be the first time I had ever baked a pie from scratch. When I found a recipe for pecan pie, I was surprised to find that it didn't call for corn syrup because it's what gives pecan pie that sticky texture and sweetness that makes your jaw ache. I made a few adjustments to the recipe and this is what I came up with.

    No Corn Syrup Pecan Pie


  • 1 cup light brown sugar substitute
  • 1/4 cup white sugar substitute
  • 1/2 cup butter or margarine, melted
  • 2 eggs
  • 1 tablespoon all-purpose flour
  • 1 tablespoon milk
  • 1 teaspoon vanilla extract
  • 1 cup chopped pecans
  • 1 ready made 9-inch, deep dish pie shell (by all means, make your own pie crust if you know how! I'm still taking baby steps with pie making)


  • Preheat oven to 350 degrees F (175 degrees C).
    In a large bowl, beat eggs until foamy, and stir in melted butter. Stir in the brown sugar, white sugar and the flour; mix well. Last add the milk, vanilla and nuts. Pour into an unbaked 9-in pie shell. Bake in preheated oven for 10 minutes at 400 degrees. Tent the pie edges loosely with foil then reduce temperature to 350 degrees. Bake for 30 to 40 minutes, or until done. The center will move slightly but will firm up as it cools.


    Adapted from www.allrecipes.com

    I had a tough group of judges that Thanksgiving. A few of my family members grew up in the South and I wasn't sure if they were going to like this version of pecan pie. Initially, I only told my mom that I hadn't used real sugar or corn syrup. I tend to do that some times....not tell people that its "reduced sugar" or that I used sugar substitutes because they instantly give me that face that reads: "there is no way this is going to be good." I quietly sat as everyone ate my pie. I think they noticed that it didn't have the texture of a regular pecan pie. Unfortunately, I had over baked it. It was a little dry and turned out to be more like pralines but they still complimented it. When the pie tin was almost empty, that's when my mom let everyone know how I had made the pie and everyone was surprised. I've been getting requests all year to make the pie again for Thanksgiving. On Sunday afternoon, I made it again as a practice run for this Thanksgiving and it turned out much better...more like a traditional pie. Too bad my family knows my secret now.

    ~~

    Are you in need of a pie for Thanksgiving but don't have time to make one from scratch? Why not order a pie from Mama's Kitchen (http://www.mamaskitchen.org/) for $20? Mama's Kitchen is holding their annual event, Mama's Pie in the Sky. They hope to sell more than 6,250 pies before Nov. 20, which will raise $125,000 and fund nearly 40,000 meals delivered to San Diegans who have HIV/AIDS or cancer.

    Here's how Mama's Pie in the Sky works:

    1. Visit www.mamaspies.org to purchase the Thanksgiving pies of your choice: apple, pumpkin, pecan, or no sugar added apple pies. If you have a friend or colleague selling pies, choose their name. Otherwise you can just purchase from Mama's Kitchen directly.

    2. Select a convenient pick-up location. The pies will be available for pick-up at one of 19 Wells Fargo Bank branches throughout San Diego County or at Mama's Kitchen, located at 3960 Home Avenue, San Diego, Calif. 92115.

    3. Go to the location you selected on Wed., Nov. 23 between 10 a.m. and 4 p.m. to pick up your pie(s) from one of our volunteers. When you open your pie, you'll discover what baker prepared your pie.

    4. To purchase a pie that will be hand-delivered to Mama's Kitchen's clients on Thanksgiving morning, select the "Love-A-Client" option. For every "Love-A-Client" pie purchased, the donor will receive an entry to win a 64MB iPad2.

    There's even something for us diabetics with the no sugar added option. How awesome is that? So many great companies, caterers, bakeries, and individual bakers, including the San Diego Food Blogger's very own Jenny Williams from http://www.jennywennycakes.com/ (maybe you'll get one of her pies!) are participating in this amazing event. You too can participate by purchasing a pie for a great cause. Hurry because the last day to place your order is November 20th. What are you waiting for? Thanksgiving just wouldn't be complete without pie.


    Thanks to Scatena Daniels Communications for providing the press release from Mama's Pie in the Sky 2011.

    Sunday, November 6, 2011

    Diabetes Awareness Month, Team DiaBatman, and a Giveaway!

    Note: Okay, so on my last Wordless Wednesday post, I said I would let everyone know where I've been and why I went MIA from my blog for a couple of weeks. I then realized I had a much more important topic to write about this week so I promise I will get around to writing about my most recent adventure.


    When I was a little girl of about 7 or 8, I remember sitting in the living room with my biological father as he showed me how to draw a tiny drop of blood to test his blood sugar. At that time, I didn't understand what it meant and I'm sure I just wanted to go outside and play with my friends. Fast forward to my 1st year in college when I had to go to the student medical center to get a check up. I remember being told by the doctor that I was prediabetic and that I needed to start monitoring myself. At the time, like most people in their early 20s, I was in denial and didn't want to think about being "sick." As I entered my mid to late 20s, I started to notice I was getting tired all the time. My mom had recently gone to the doctor for a physical and she had been diagnosed with type-2 diabetes. Since diabetes is highly heredity, I decided it was time to face the facts that I needed to get myself checked.

    This topic is not my usual light hearted subject about baking and recipes but just like baking, it's a topic that I hold very dear to my heart. November is National Diabetes Awareness month and along with 18.8 million diagnosed children and adults in the United States, I am a diabetic (type 2). I just wanted to share a few shocking statistics about diabetes:

    Total: 25.8 million children and adults in the United States—8.3% of the population—have diabetes.
    Undiagnosed: 7.0 million people
    Prediabetes: 79 million people*
    New Cases: 1.9 million new cases of diabetes are diagnosed in people aged 20 years and older in 2010.
    * In contrast to the 2007 National Diabetes Fact Sheet, which used fasting glucose data to estimate undiagnosed diabetes and prediabetes, the 2011 National Diabetes Fact Sheet uses both fasting glucose and A1C levels to derive estimates for undiagnosed diabetes and prediabetes. These tests were chosen because they are most frequently used in clinical practice.
    Under 20 years of age
    • 215,000, or 0.26% of all people in this age group have diabetes
    • About 1 in every 400 children and adolescents has diabetes
    Age 20 years or older
    • 25.6 million, or 11.3% of all people in this age group have diabetes
    Age 65 years or older
    • 10.9 million, or 26.9% of all people in this age group have diabetes
    Diabetes can also cause complications such as heart disease, high blood pressure, blindness, kidney disease, nervous system damage, and amputation when not controlled. In 2007, the total cost of diagnosed diabetes in the United States is $174 billion.


    Unfortunately, there is no cure for diabetes yet. Many of us who are diabetic have to monitor our blood sugar everyday, exercise, and take medication such as pills or insulin. It's not an easy road but with your help, we're on our way. So how am I doing my part and how can you help this year? I'm doing it by assisting a family friend and her daughter who has a form of type-1 diabetes. Her name is Rachael Stickles and although we have two different forms of diabetes and our paths are very different, we share a common goal to make people aware of diabetes and agree that something needs to be done to find a cure. Read more about Rachael's journey here. On November 12, 2011, Rachael's team, Team DiaBatman and half a million walkers will be involved in the JDRF's Walk to Cure Diabetes in San Diego, CA. You too can help by donating on Rachael's page and help her reach her goal of $500. As of today, she's just about halfway there.

    As an incentive to donate, I'm holding a small giveaway. Here's how it works:
    
    
    1) Go to Rachael's Team DiaBatman homepage HERE and make a donation for any denomination. Enter your name to be listed on the Fundraising Honor Roll (you don't have to leave the amount you donated). Every dollar counts! In order to qualify for the giveaway, please make your donation by Saturday, November 12 at 9:00PM PST.

    2) Leave a comment on this page letting me know you made a donation.

    3) If you've already made a donation, to gain an extra entry, tweet a link to my blog and leave a separate comment with your Twitter name.

    4)  The winner will be chosen at random using random.org. I will announce the winner on my blog on Sunday, November 13th. The winner then has until Sunday, November 20, 2011 to respond or a new winner will be chosen.
    The winner will be sent a Jessie Steele hostess apron with the design on their choice such as the one pictured (value up to $30, picture from http://www.laylagrayce.com/ ). The giveaway is open to everyone and not limited to those in the United States.

    I hope you will help Rachael reach her goal by making a donation today. Tune in next week for the announcement!


    Please note that this giveaway is strictly for the promotion of Team DiaBatman & reaching their goal for the JDRD's Walk to Cure Diabetes. www.SweetSueshine.com  was not given anything by JessieSteele.com or any vendors that carry the line. The prize itself was puchased out of my own pocket because I just plain like the product, think they are ultra cute, and think every baker should have an apron. Shipping costs will also be covered out of my own pocket.

    Wednesday, November 2, 2011

    Wordless Wednesday - Where has the Sueshine been hiding?


    I've been MIA for a couple of a weeks but for a good reason. Tune in shortly to see where the Sueshine has been hiding lately. Picture taken high above the southern California desert.


    Sunday, October 9, 2011

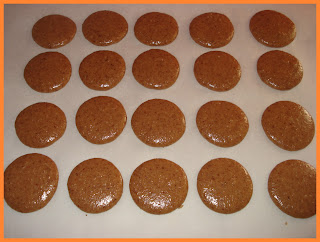
    Hello Autumn! - Spiced Apple French Macaroons

    Fall has always been my favorite season because I've created so many great memories during this time of year:


    When I was little, seeing all my friends after a long summer break from school.
    The start of football season...both professional and getting to see my younger brother play for his
     high school team.
    Going to Julian for a slice of apple pie.
    Getting ready for the holidays with my giant Filipino family.
    A much needed relief from the Southern California heat.
    Added a little beagle to our family 7 years ago
    Called Scott my husband for the first time.
    This year, my first real vacation in over 15+ years.

    Fall also means being able to bake some of my favorite comfort items and adding new favorites to my recipe box. I wanted to start Fall out right by trying to make something I have never made before but with a traditional Fall flavor.
    Ever since my cousin got engaged, she's been showing me all kinds of treats that she would love for her wedding. I did notice the one item that she really wanted were French macaroons. French macaroons are extremely popular wedding favors because they come in a variety of colors to match your wedding and also come in a variety of flavors. I wanted to surprise her and see if I could make macaroons. The problem was that I knew what the taste and texture of a traditional macaroon was (you know...like a coconut haystack) but I've never had the chance to try a French macaroon. Heck, I'm not even sure of the correct spelling. Is it macaroon or macaron? Do I have to say it with a French accent? So when in question, what do I do?
    Moooooooom!!!

    I was at my parents house a couple of weeks ago and showing my mom pictures of macaroons on the Internet. I told her I wasn't sure how to make it and what the consistency should be with the meringue then the batter or even the size of the cookies. Talk about scary. "I remember making something like these," she said. "We have something like these in the Philippines that I really like." Oh yeah....she's falling into my trap. "It'll be easy to make the meringue on my stand mixer." Score! "Can I come over on Saturday and make macaroons?" "Sure." Okay, so I kinda tricked my mom into helping me make macaroons but who better to have a learning experience with than with your own mom? With lots of guidance and tips from my mom, I made a batch of macaroons, dyed them a really pale pink, and filled them with Nutella. I shared them with my cousin the next day and she loved them.

    So with my new found talent for making macaroons, I decided to blog about them. But I wanted to make special ones for Fall. Luckily, the macaroon cookbook I bought had a recipe for spiced apple macaroons and here's how you make them:

    Spiced Apple Macaroons

    Ingredients
    3/4 cup almond flour (available in bulk at Sprouts or made by Red Mill)
    1 cup powdered sugar
    1 tsp ground cinnamon
    2 extra large egg whites
    1/4 cup superfine sugar

    Filling
    1 lb granny smith apples (cored, peeled, and chopped)
    3 tbsp superfine sugar
    1 tbsp water

    Sift powdered sugar, almond flour, and cinnamon on a large piece of parchment paper. Set aside.
    Place egg whites in a bowl and whip until holding soft peaks. Gradually beat in sugar to make a firm, glossy meringue. (This step is much easier if you have a stand mixer)


    Using a spatula, fold in dry ingredients one-third at a time. (If using a stand mixer, change to a paddle and set on the lowest speed) Fold until the mixture forms a shiny batter and forms a thick, ribbon like consistency.
    Pour batter into a pastry bag with a 1/2 inch tip. Pipe 24 circles onto a baking sheet covered in parchment paper. Tap the baking sheet to remove air bubbles.
    Let stand at room temperature for 30 minutes.


    Preheat oven to 375*F
    Bake for 10-15 minutes. Cool for 10 minutes then carefully peel the macaroons off the parchment paper. Cool completely on a cooling rack.
    To make the filling, place apples, sugar, and water in a small pan. Cover and simmer for 10 minutes until soft, careful to stir occasionally so the sugar does not burn. Mash with a fork to make a puree. Cool and use to sandwich two cookies together.


    Adapted from Macaroons: 30 recipes for perfect bite-sized treats

    Sueshine notes to making successful macaroons:
    1) There are a few items you're going to need other than the ingredients to make macaroons: piping bag, Wilton tip #12 (or similar round), baking sheet, parchment paper, and a stand mixer is helpful when making the meringue but by no means a requirement. You will need some kind of mixer with several speed settings.
    2) Use my template. I designed this to make mini macaroons and regular sized macaroons for myself but I thought I would share because sharing is caring. Place the printed sheet under the parchment paper, using as a guide to pipe the batter (stay inside the circle or your macaroons will be too close) then carefully slip the paper out from under the parchment paper. This will help you make equally sized macaroons.
    3) If you are going to color your macaroons with liquid, gel, or paste food coloring, don't be shy to use a lot when you are mixing it into the meringue. Although your batter may look really dark, the color of your macaroons will lighten up as they bake.

    Macaroons are not the easiest cookies to make because there are a lot of steps. When people tell you that measurements need to be exact in baking, macaroons are one cookie you do not want to stray from that rule. I found that the the macaroon cookbook I bought had very clear instructions and had a whole section on helpful tips. I did not list their tips but only list my observations while making the cookies.

    I brought these bite-sized Fall treats to work and they were a big hit. I plan on making more macaroons in the future (maybe my cousin's wedding?) because I had so much fun making them and they rank right up there with my chocolate chip cookies! Another Fall memory created: Made my first French Macaroon!

    Sunday, October 2, 2011

    Killer Doughnuts!

    In honor of the new season of one of my favorite TV shows ever, DEXTER, I made doughnuts.

    
    Photo from http://www.sho.com/
    

    If you haven't seen an episode of Dexter, why not?! I'll have to admit, Dexter is not for everyone but I think it's one of the most original series on television. To give you an idea what Dexter is about, it's about a guy who is a blood splatter analyst for the Miami police department, has a sister who is a detective, had a father who was a cop, has a family, and seems to be an all around nice guy. But he has a secret that he calls "The Dark Passenger." What's Dexter's secret? He's a serial killer. But it's okay....cause he only kills bad guys and oddly, he's super likable. Each episode leaves you cheering for the killer.

    What does a serial killer have to do with doughnuts? Better yet, how on earth is a doughnut recipe being shared by a diabetic blogger? Talk about a killer food *budah bum!* Yeah I know, that was a lame joke. Anyways, Season 6 of Dexter starts tonight and throughout the seasons, Dexter, being the super guy that he is, brings in doughnuts to all his co-workers. I believe it's his weird serial killer attempt at being "normal." As far as this diabetic baker goes, my diabetes and horrible sweet tooth is my "dark passenger." I struggle with my sweet cravings every single day and as I've talked about in the past, I have a really hard time finding ready made baked items to satisfy the cravings. I've have to learn how to make them myself. Breakfast is especially difficult because during the week, pastries and doughnuts are so convenient for regular people to just grab as they rush to work. So when I received my daily email from Diabetic Living Online and saw a recipe for doughnuts, I was all over it. I ran to Michael's to grab a donut pan (retail $9.99), picked up some ingredients from the grocery store, and went to work.

    Vanilla Cake Doughnuts

    1 1/4 cups white whole wheat flour
    1/2 tsp baking soda
    1/4 tsp salt
    1/2 cup plain yogurt
    1/2 cup packed brown sugar or brown sugar substitute blend (equivalent to 1/2 cup brown sugar)
    1/4 cup refrigerated or frozen egg product (or 1 egg)
    2 tbsp canola oil
    2 tbsp granulated sugar or sugar substitute blend (equivalent to 2 tbsp sugar)
    1/4 tsp ground cinnamon

    Preheat oven to 375F. Coat doughnut pan with non stick cooking spray.
    In a medium bowl, combine flour, baking soda, and salt. In a small bowl, combine yogurt, brown sugar, egg, oil, and vanilla; whisk until smooth. Add yogurt mixture to flour mixture; stir until well mixed and smooth. 
    Spoon batter into a large resealable plastic bag. Using scissors, cut off a corner; squeeze batter into prepared pan, filling each indent about two-thirds full. Bake about 8 minutes or until doughnuts are nearly firm when lightly pressed. Cool in pan on a wire rack for 3 minutes; turn out doughnuts onto rack.
    In a small bowl, stir together granulated sugar and cinnamon. Dip warm doughnuts into sugar mixture, turning to coat. Makes 24 mini doughnuts (3 doughnuts per serving)


    Sueshine notes about this recipe:
    1) The recipe above shows how to make cinnamon sugar doughnuts which is certainly one my favorites. If you shake the doughnuts in the cinnamon sugar, be sure to do it while the doughnuts are still warm because there will be a little bit of moisture, allowing the blend to stick. The hubby suggested that I try making alternative toppings. He said he woke up the other morning wanting a chocolate glazed doughnut.

    -Powdered Sugar made from Splenda: 3/4 cups Splenda granular, 2 tbsp cornstarch. Blend in a blender into a fine powder. Dust onto doughnut or follow directions from above (yields 1/2 cup)
     -Chocolate glaze: 3 tbsp margarine, 1 square of unsweetened chocolate, 2 tbsp hot water, 1 cup  sugar substitute. 1/2 tsp vanilla. Melt chocolate and butter. Combine with hot water. Blend with sugar and vanilla. Dip one side of doughnut into glaze and dry on cooling rack.
    2) The recipe above is for mini doughnuts. I couldn't find a mini doughnut pan but as I stated above, I found a pan at Michael's with 6 standard size doughnuts. This recipe yields about 6-8 regular sized doughnuts.


    Promise me you'll watch Dexter ? Good. If you don't have Showtime, run out to the store to buy a few of the past seasons (average cost is about $20-$25 per season) or add them to your Netflix lineup. Enjoy a doughnut while your at it. Who said you couldn't have a doughnut for dinner? :)

    note: Dexter starts tonight, October 2 at 9:00PM ET/PT
    

    Sunday, September 18, 2011

    Holding onto Summer - Mini Pineapple Mango Tarts

    As summer comes to an end in Southern California, I wanted to make something that reminded me of summer...something reminiscent of a tropical fruity drink. Also coming to a close is my 6th month of blogging. For those of you who don't know, Blogger tracks your stats and what key words brought readers to your site. The top search for my site was for puff pastry recipes. It's good to know you all have the same love for puff pastry as I do! I mean, I did devote a week to it HERE. So in celebration, I made a super easy mini pineapple mango tart that just about anyone can make.


    Mini Pineapple Mango Tarts

    Ingredients

    1 large ripe mango, peeled & diced (about 1 1/2 cup)
    1 4oz can of cubed pineapple in natural juice (fresh can be used if available)
    1 lime
    1 1/2 tbsp butter
    2 1/2 tbsp packed brown sugar
    1 sheet of puff pastry dough
    1/2 cup whipped cream or frozen whipped topping (optional)

    Preheat oven to 400F. Grate 1 1/2 tsp lime zest  (optional) and squeeze 1/2 of lime (add more to taste).


    Spray a muffin pan with a non stick spray.Unfold the pastry sheet on a lightly floured surface. Roll the pastry sheet to remove the fold marks. Using a round cutter (a glass or cup can also be used), cut into 8-12 rounds. Roll rounds thin and shape into muffin tin. Edges should slightly come over the top of the hole. Refrigerate.


    Melt butter in a saucepan over medium heat. Add the brown sugar and lime juice and cook until the mixture boils. Stir occasionally. Add the mango and pineapple, coating the fruit. Remove from heat.


    Spoon fruit mixture into the pastry cups. Bake for 15 minutes or until pastry is golden brown. Cool then remove from pan. Top with whipped cream and garnish with lime zest.
    Adapted from puffpastry.com
    

    Sueshine notes
    1) Please flour your surface and rolling pin or the puff pastry will stick to it and everything near it, including you!
    2) Please please spray your muffin pan. The tarts may stick if you don't do it.
    3) Please please please wash your saucepan immediately. Even though I used a non stick pan, as soon as the sugar starts to cool, it will start sticking to your pan. Are you seeing a trend in my notes for this recipe? :)

    The whipped cream is not pictured in this post just because the day I made them, I was taking it to the San Diego Food Blogger's Roundtable brunch and I wasn't sure if it would hold up. I would add the whipped cream. What's a fruity drink without the whipped cream, right? Here's to the end of summer and many more blog posts to come! Cheers!


    Tuesday, September 6, 2011

    Banana Crruuuunch!

    Flash back to early last week....(my mom's house)

    Me: How would I make turon diabetic friendly?
    Mom: You can't.
    Me: Even if I use Splenda brown sugar? Do you think it would crystallize like regular brown sugar?
    Mom: I don't know. Even if you did use Splenda, the rest of it is all carbs.
    Me: Hmph!

    Flash forward to Sunday...

    Way to burst my bubble mom! If you haven't noticed, I haven't actually made anything for the last few blogs. It's been way too hot in east San Diego for the past month and my poor little window AC unit cannot beat my hot oven while I'm baking. I've been wracking my brain on what I could make that wouldn't make my tiny kitchen feel like the surface of the sun. Easiest solution: don't bake. I know my blog is mainly about baking but it's also about sharing my favorite sweet items. My obsessive nature has been nagging at me because I've been wanting to make my FAVORITE Filipino dessert for over a month and share it with all of you but for the life of me, I couldn't figure out how to make it diabetic friendly. So I asked my mom. Who needs a cookbook or the Internet when you have a Filipino mom with a degree in nutrition to bounce ideas off of? Unfortunately, my mom's response wasn't what I wanted to hear. So on top of my obsessive nature, my stubborn self went ahead and made the dessert. My favorite Filipino dessert is turon.

    So what is turon? I tried to describe it to my co-workers and the best thing I could come up with is that it's like a dessert lumpia (or eggroll). On Saturday, I went to the Asian market which always brings up tons of memories. I remember always going with my Lola (grandmother) and my mom as a kid to buy fresh fish and even better, to get my cool snacks like Pokey and lychee jelly that a lot of my classmates in grade school were curious about. These days, I still go to the market with my mom to go eat Filipino food or just to entertain my husband who always goes in search for blue crabs escaping from their box. 

    What you'll need at the Asian market.... 

    Saba Bananas They have the starchiness of a plantain but the sweetness of a regular banana and they can hold up to cooking. The carb in the banana is what makes it not so diabetic friendly but we can discuss that later.
    Eggroll wrappers Found in the frozen food aisle, my mom recommends going with the round ones.
    Langka or jackfruit (optional) I ended up not getting this because it usually comes in a can or jar of simple syrup. If you aren't sugar challenged, go ahead and get this for an added texture.

    At the regular market...

    About 1/2 cup brown sugar (Splenda brand if you would like)
    1 egg, beaten with a 1/2 tsp of water
    cooking oil (enough to cover the turon)

    Cooking directions...
    Slice the bananas lengthwise then in half.
    Roll the banana slices in brown sugar until coated.
    Place the banana slices close to the edge of the eggroll wrapper. Begin to roll the banana in the wrapper towards the center. Fold in the sides then continue rolling until about 1/2 inch to the edge. Dab some of the egg wash on the edge of the wrapper then seal the eggroll.
    Heat cooking oil. Carefully drop the turon into hot oil and cook until golden brown. Some of the brown sugar will come out of the roll and will crystallize on the outside as it cools.

    End result...
    A small package of crunchy, sweet goodness! Now don't get too excited and take a bite of this right out of the pan...it will be hot. Cool the turon on a wire rack or in a bowl with the the turon in a vertical position so it drains. Unless you want to eat paper towel, DO NOT put it on paper towel. If you do, its guaranteed to stick. Another reason to wait? When the sugar begins to cool, the sugar will harden and create another crunch on top of the crispy eggroll wrapper. For obvious reason, this is not diabetic friendly. I'm simply sharing a dessert that I love. IF YOU ARE DIABETIC AND CHOOSE TO EAT/MAKE THIS, please be mindful of your individual recommended diet by your doctor. On a side note, I saw an endocrinologist this last week and my diabetes is finally under control! I still won't indulge in a ton of turon but I think one will be okay ;)
    Related Posts Plugin for WordPress, Blogger...